
The end of the holiday means only one thing – the start of new semesters in language schools. While your students were on a well-deserved vacation, we wondered how to improve the functionality of our Platform to make it even more intuitive and automated. This time, instead of adding more solutions, we decided to improve the existing ones. See what changes await you in LangLion!
Payment import – automatic creation of transactions
Process automation in language school is the main idea that guides us when making any changes. We want LangLion to relieve you as much as possible, especially now that your involvement is often needed in other activities than administrative work. So you will be happy to know that in the Finance module, besides the import of payments and manual creation of transactions, there is now also an option to create transactions automatically. How can you use it? After you import the file, your student contributions will be assigned to three categories:
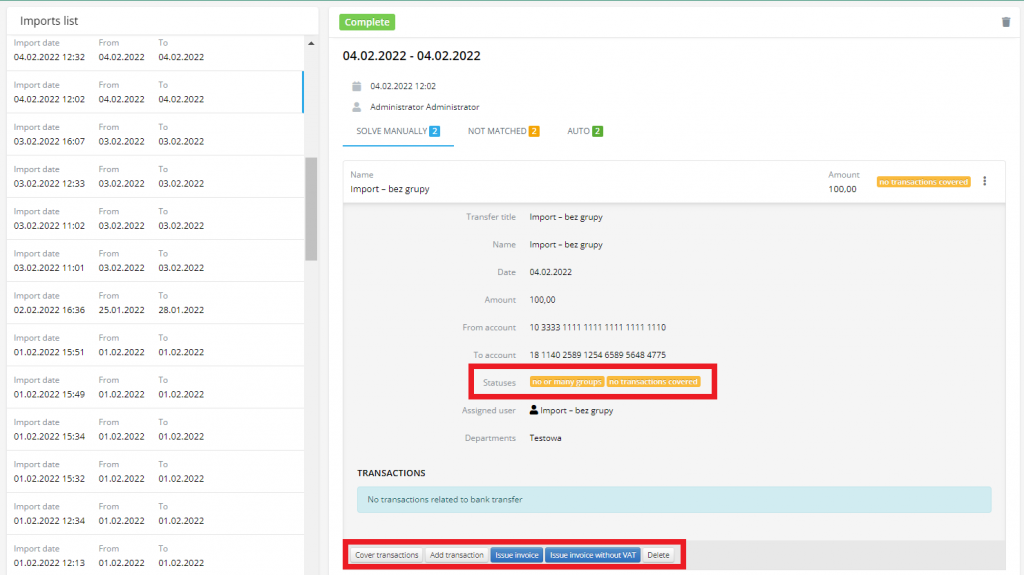
1. Solve manually
This tab will include transfers that, based on the account number, have been assigned to a student who is not enrolled in any of the established groups or who attends classes in more than one group. You can use the deposit details to assign a transfer to a previously created transaction or create a new, already paid transaction using the „Add transaction” function. From here you also can issue an invoice or completely remove the transfer.
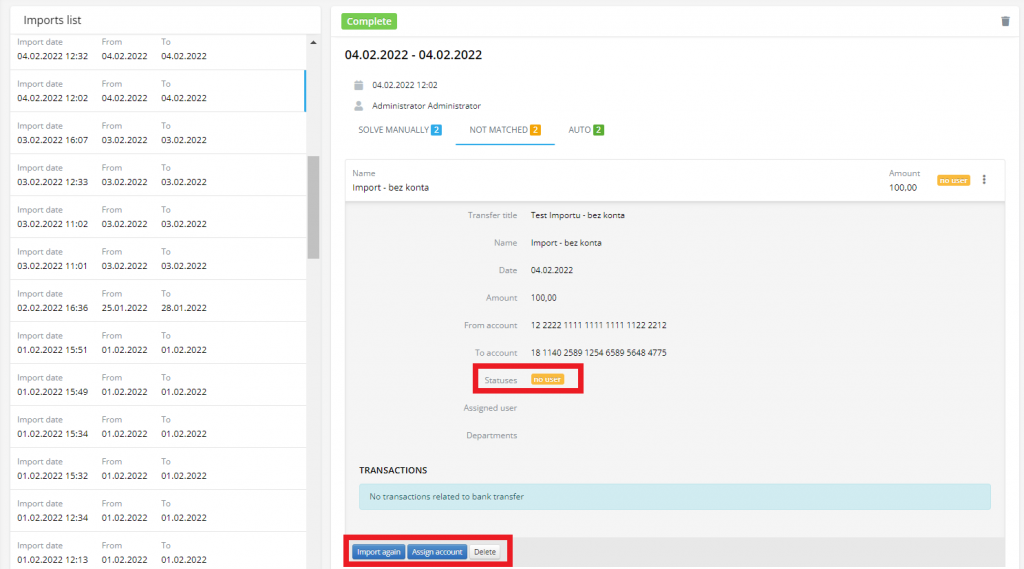
2. Not matched
Here you will find transfers that the system could not match to any of the students for two reasons: they have no account number assigned to them or the same account number is assigned to multiple users, e.g. one parent pays more than one child to learn. Here, you can use the deposit details to assign an account to the user, re-import the deposit, or, as in the previous case, delete the transfer.
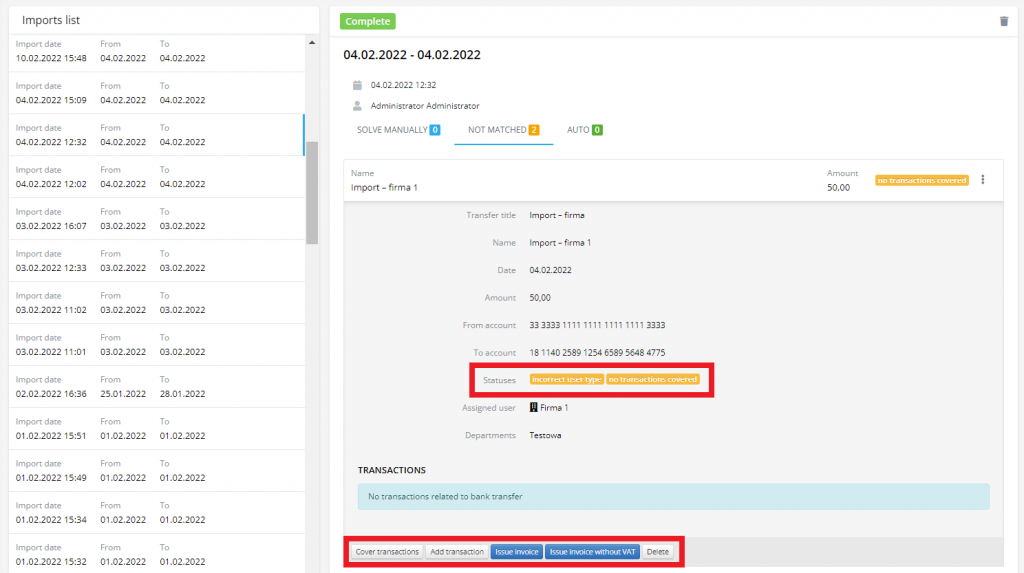
If the transfer was made by a company that uses your courses, you have the opportunity to: assign a deposit to the created transaction, create a new transaction/invoice, or delete the deposit.
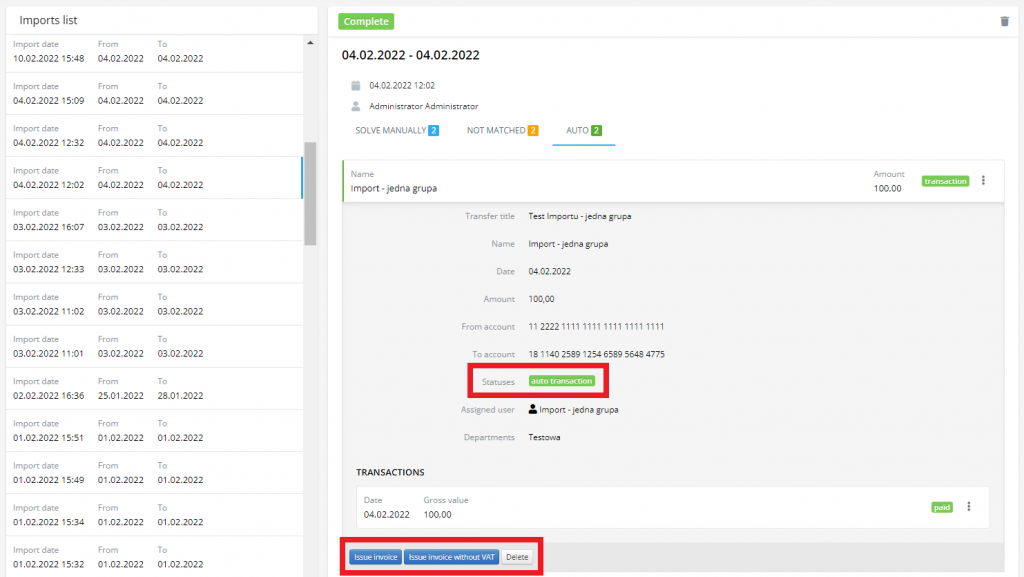
3. Auto
The last tab requires the least of your effort. Here you will find all transfers that have been matched to the students based on the previously completed account number. The good news is that if the student does not have a pre-entered transaction to pay, you do not have to enter it manually. The system will add the already paid-for transaction, assigned to the group that the student attends. Here additional options are to issue an invoice or delete a transfer.
Create invoices automatically
Another novelty in the import of payments, which was created at the request of our users and will greatly facilitate and automate work in the Finance module. When you use the option to create transactions automatically, you also have the option to create invoices automatically! How does it work? Thanks to the aforementioned tab „Auto”. Invoices will be created for all the deposits that go here, in addition to the automatically created transaction. Simply select the additional option „Automatically create transaction” and select the default numbering you would like to apply.
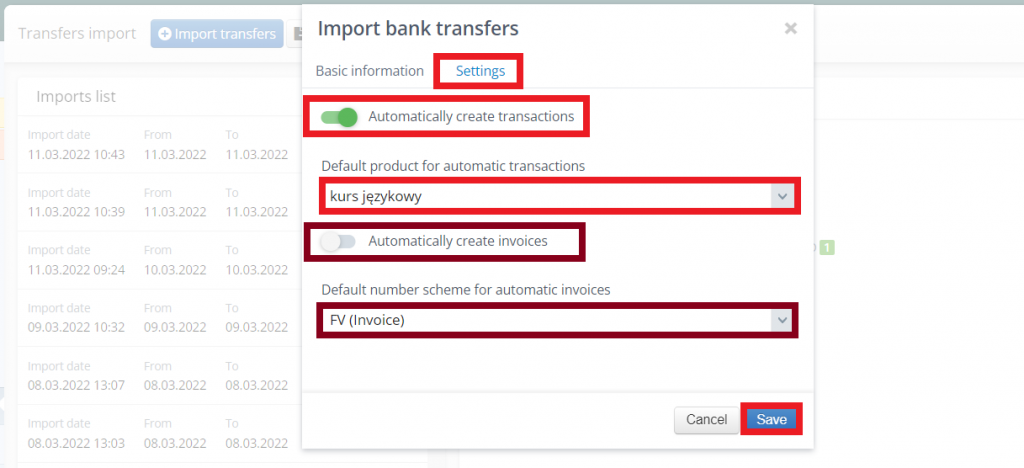
Now, you might think that’s the end of what we can do automatically, but I’m going to surprise you because it’s not! Our new option can be combined with the already available feature „Automatic sending of invoices/cash documents to the user’s email address”. So, the invoices will be sent to your students as soon as they are created! And how do you like that?
A detailed guide can be found here: https://help.langlion.com/en/system-guide/finance/transfers-import/
Student Agreement – facilitation for students
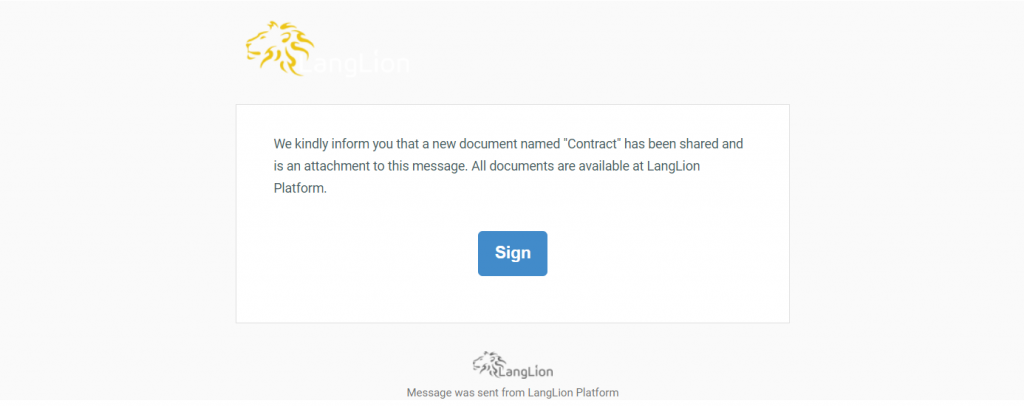
Who did not have to ask hundreds of times, remind and watch his students sign contracts on time cast the first stone. Fortunately, in our updates, there is room for a solution for the most resistant ones. The „Sign” button will now be displayed in the email when sending the contract to the student. By clicking, the participant in your courses will automatically be transferred to the Student Panel to sign the document. Now, you will not fear any excuse. 🙂
For a detailed guide on how to create a student contract, see: https://help.langlion.com/en/system-guide/secretariat/creating-students-contract/
Group bookings – status change
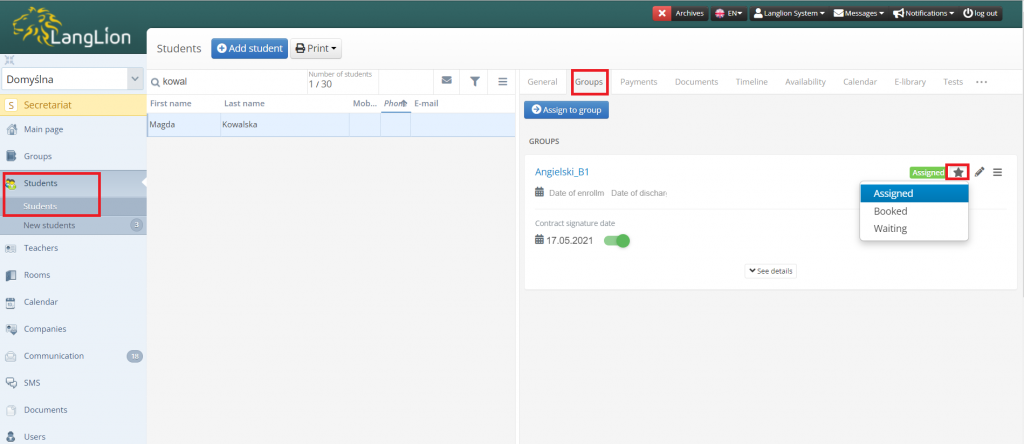
Another feature that will improve the ergonomics of your work. LangLion allows you to divide students into three lists: enrolled, reserved, and pending. Until now, to change the status of the student you had to do it from the „Groups” tab. To make course enrollments easier for you, we decided to make a small change. Now you can easily change the status of your student from the „Students” tab – „Groups”. Just click on the star icon and select the appropriate status. Ready! A small thing, but gives a lot of joy. 🙂
Tip: This feature is enabled at the request of the school, so if you want to use it, please email us at support@langlion.com
You will learn the rest of the features in our guide: https://help.langlion.com/en/system-guide/secretariat/reservations-in-groups/
Billing data – new options
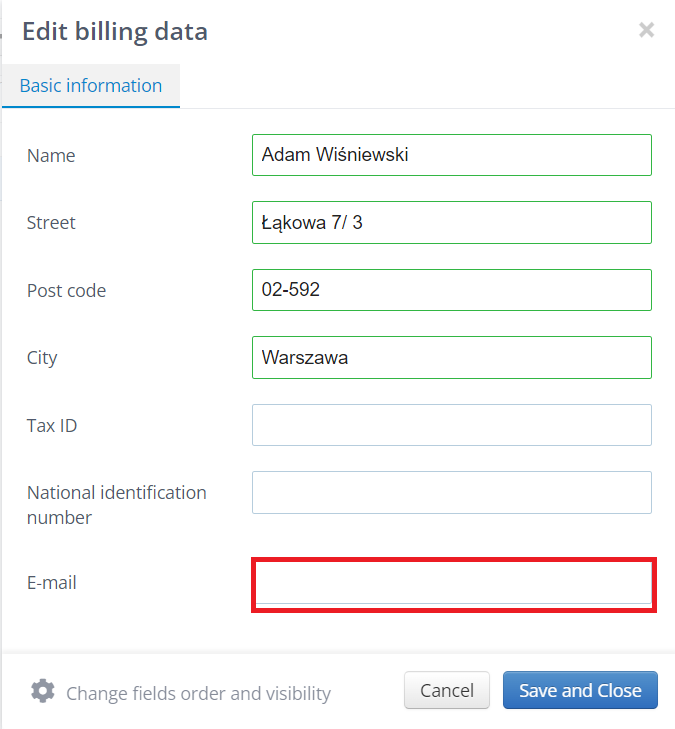
Thanks to the billing data in the system, you can issue invoices to other data than the student data stored in LangLion. This makes it easy to separate the data that should be on the Platform and the data necessary to issue financial documents. From now on, you also can enter a separate email address, to which these documents will be delivered. This will make it easier for you to separate the course communication from the financial issues associated with e.g. the company that the invoice is issued to.
You want to see how to change and complete your billing data. Click here: https://help.langlion.com/en/system-guide/secretariat/billing-data/
Assign a student to a group – facilitations
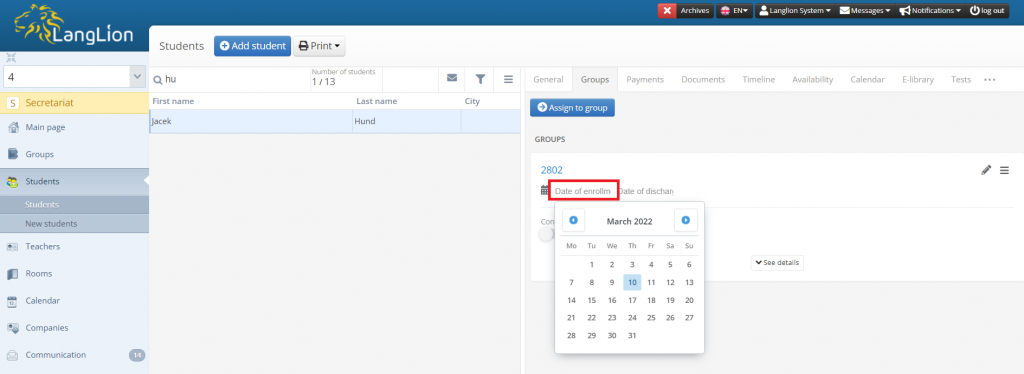
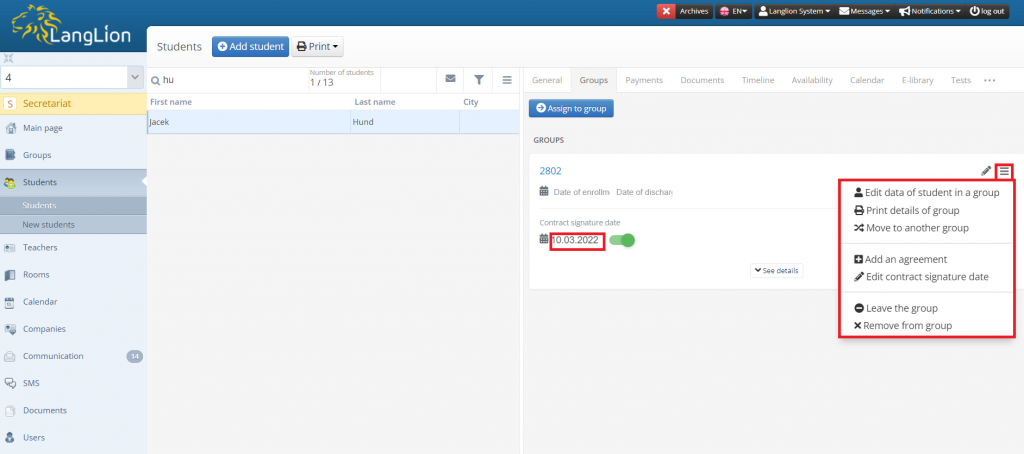
This is one of the most basic functions without which group management would not be possible. That is why, here too, we have decided to make changes to make your daily work easier. When you add a student to a group where the classes are already in progress, you must assign them a date to join the group. To do this, you have to click on the drop-down menu on the right side of the window and select the „Edit data of student in a group” function. Now you have the option to change the dates, directly on the „Groups” tab. All you have to do is click on „Date of enrollment” and select the appropriate date. Here you can see what it looks like at the moment:
All information about assigning students to the group can be found here: https://help.langlion.com/en/how-can-i-assign-a-student-to-the-group/
That’s the end of novelties, but only for now, because we are already working on the next ones. As Patryk Chmielewski said on Q&A: „We won’t stop until you start drinking your palm cocktails, and LangLion’s gonna start to make you a coffee.” All jokes aside, you have provided us with a lot of inspiration today, for which we thank you! See you soon.
